November 20, 2009 by Mark Tweedie
Paper Negative - the Underestimated Medium
I have had a number of requests recently to explain the use of paper negatives in pinhole photography. What I describe here is of course not restricted to use in pinhole cameras but can be applied to any camera which can be modified to accept a non-standard negative. I have used paper negatives with extremely good results in a standard 4×5 camera as well as a range of pinhole devices. Using paper rather than film seems to be shrouded in notions of difficulty and unpredictability when in fact it is very easy to use and, if cost is an issue, extremely cheap. Apart from the need for some kind of makeshift or permanent darkroom, the principle obstacle encountered is the excessive contrast of photographic paper but this is in fact quite simple to control and produce images with a smooth tonal range.
First of all, be aware that photographic paper is more sensitive to the blue wavelengths of light so any subject reflecting or emitting blue light (e.g. blue skies) will over-expose more easily than might be expected with panchromatic film.
The second thing required to control contrast (assuming that is what you aim to accomplish) is pre-flashing of the paper negative under the enlarger prior to loading it into the camera or film holder. Pre-flashing is quite simple but it does need a bit of experimentation. Basically what you need to achieve is to add some exposure to your paper but not enough to alter the pure base white.
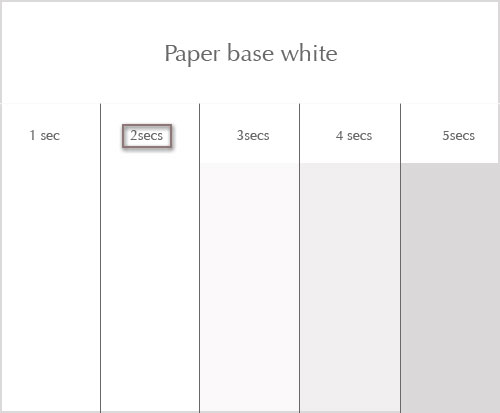
Practically speaking, in order to pre-flash, set up your enlarger with no negative in the carrier and a sheet of unexposed paper on the baseboard. I have have found an exposure 2 seconds at f16 with the enlarger head set at approx 65cm from the base board works for me, although your setup will be different, no doubt. Next make a test print with intervals of, say, 2 seconds between one and the next. It might be worth stopping down a bit more than I do to give a bit more latitude for different exposures. Develop fully, wash and dry, then in good light find the exposure BEFORE the exposure which gives you the lightest of light grey (Zone IX in zone system parlance). For example, in the picture below, 2 seconds would be the optimum exposure, one second being too little and 3 seconds too much.

You might have to do this a few times to find exactly the exposure needed. Once you have found it though you can pre-flash a number of sheets and keep them for use like film. Make a note of the settings and just run a quick confirmation test when you make your next batch of pre-flashed sheets. I use a grade 1 filter whilst preflashing on Ilford Multigrade and end up with a negative medium with a sensitivity of around ISO 6. In my experience there is always a slight change from one session to the next but the basic exposure you establish will be a pretty sound starting point. After this no other contrast control should be necessary beyond a sympathetic assessment of the colour temperature of the light at the time of exposure. Experience will be a good guide here.
At the point of development a very dilute or partially exhausted developer will help you to control the contrast by allowing you the time to pull the negative out of the bath before it goes too dark or contrasty. Again, experience here will help you get things right. I prefer to alternate the negative between a weak developer bath and a water wash and allow between 2 and 10 minutes of development according to the density of what appears. It is a fairly imprecise process from start to finish so you will have to play things by ear! I wouldn’t worry if the negative looks flat (either under the safelight or after washing). I find that even very weak or flat negatives can scan very well. The hardest to work with are overly contrasty or over-exposed negatives. If you intend to make contact prints I think you will find things harder to get right but scanning and digital printing will give plenty of leeway for adjustments.
There is some discussion amongst aficionados regarding the finish of the paper employed as a negative, glossy or matt. If using a curved film plane (e.g. a biscuit tin) you may find that the shiny surface of glossy paper reflects back on itself causing unwanted lighting blemishes. If you wish to avoid this it may be preferable to use matt or satin-finish paper although glossy paper will produce a sharper final image as its surface has little or no texture to blur the contact between the negative image and the platen of the scanner or the surface of the contact printing paper. Personally I always use Ilford Multigrade satin paper as I find its slightly uneven texture adds a certain unpredictability to the result which for me is part of the excitement and charm of pinhole photography.

As a final plug for the benefits of paper, in these post-polaroid days if you need a quick confirmation of exposure or composition and happen to be working near a darkroom, it is possible in just a few moments to see the result obtained. And there is always the thrill of seeing a print come to life under the red safelight, a thrill which never seems to diminish no matter how many prints pass through the developing tray.